 Stitch Sprint
Help › Start here
Stitch Sprint user's guide
This guide walks through the jobs a shop does every day, step by step, with a picture of each step. The example all the way through is the Stitch Sprint logo (a navy S with an aqua needle, and the words STITCH SPRINT): open your own artwork in its place. For every setting and number, see the reference pages. Something not working? Go to Troubleshooting.
Contents
- Before you start
- A tour of the window
- Your first design: a logo
- Adding a name or slogan
- Team lettering: arcs, badges and outlines
- A team order from a names list
- Adding to a customer's DST
- Choosing threads
- Fabric, caps and hoops
- Watching it sew
- Layers: switching colours off and changing the order
- Applique and tackle twill
- Saving, and what you get
- A proof and a price for the customer
- Checking and fixing a DST
- The library
- Running it on the machine
- Changing a saved design
- Telling us how it sewed
- Getting help
1. Before you start
- Install Stitch Sprint and open it. See Installing and running. (It runs on a Mac today; the Windows version is in testing.)
- Sign in with the email you subscribed with and the six-digit code emailed to you. See Your subscription.
- Keep it handy: on a Mac, drag it to the Dock.
- Check the version at the top right of the window ("Stitch Sprint 0.27.0").
- Set your shop name and prices once with Shop name and prices… (see section 14).
2. A tour of the window
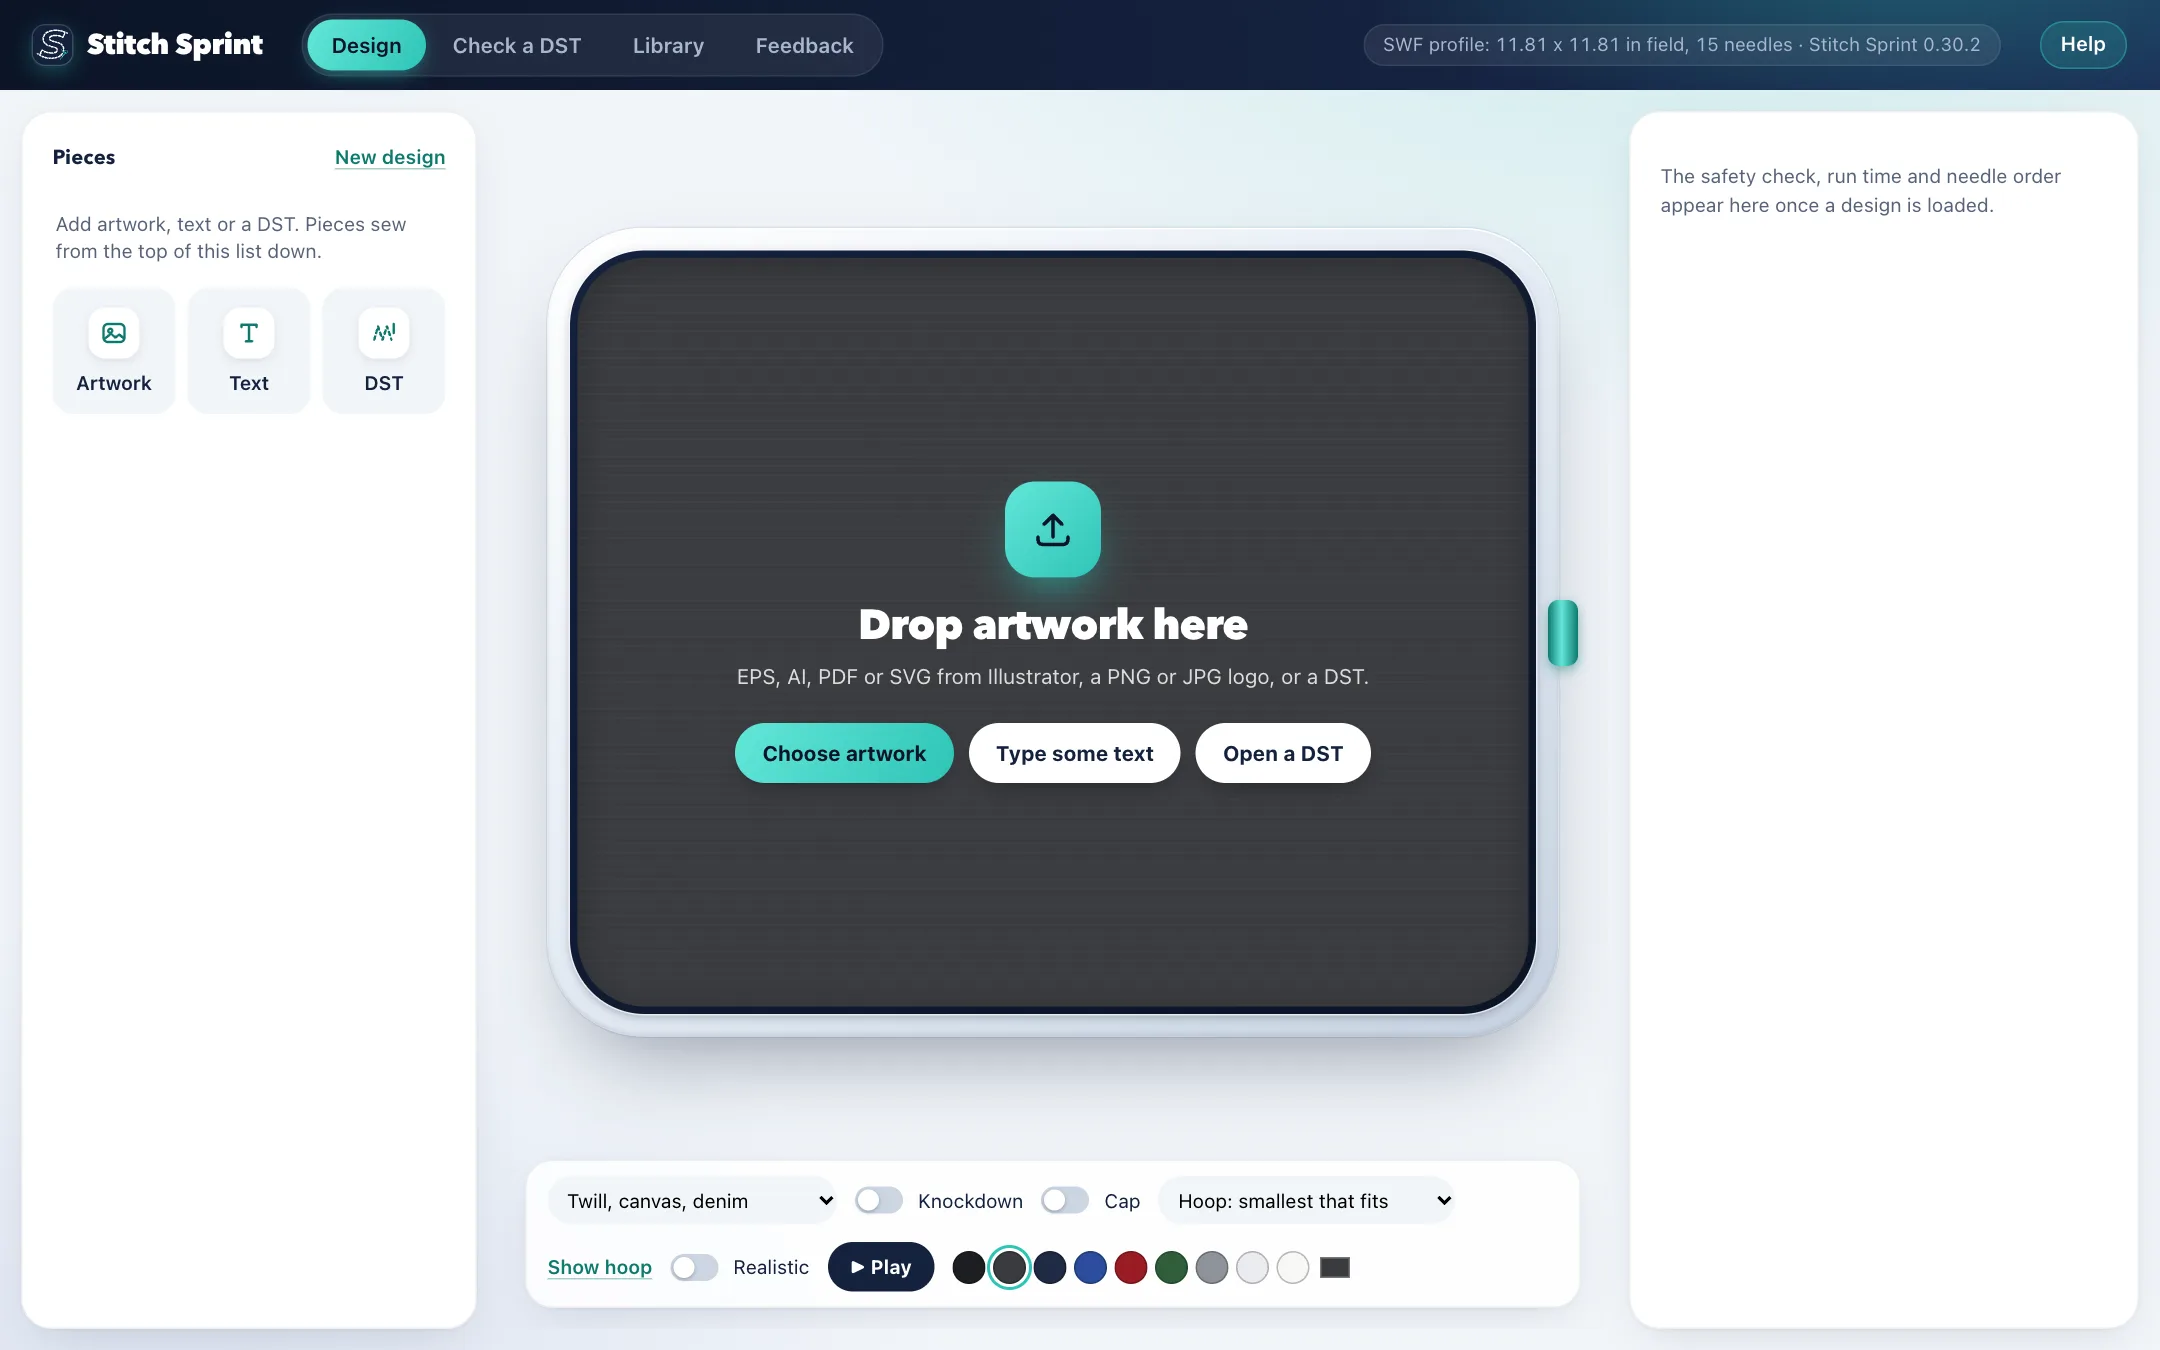
| Area | What is there |
|---|---|
| Header | The tabs (Design, Check a DST, Library, Feedback), the version, and Help |
| Left | The list of pieces (Artwork, Text, DST buttons) and the selected piece's settings |
| Middle | The hoop with the design, and the bar under it: fabric, Knockdown, Cap, hoop, Show hoop, Realistic, Play, garment colours |
| Right | The verdict card (green, amber or red), run time, colours, trims and median stitch, the checks, Places to check, Threads, Save DST and the customer proof |
Keys on a Mac: ⌘O open, ⌘S save DST, ⌘Z / ⇧⌘Z undo / redo, ⌘+ / ⌘- zoom, arrows nudge the selected piece, Delete removes it, Space plays the stitch player, Esc closes it. Help > Stitch Sprint Help (⌘?) opens this Help center.
3. Your first design: a logo
Step 1. Open the artwork. Click Choose artwork on the empty hoop (or Artwork on the left), or drop the file on the hoop. EPS, AI, PDF and SVG are best; PNG and JPG work too. Stitch Sprint digitizes it straight away. While it works, a star sews out on the hoop with a tip under it; a large or detailed logo can take half a minute.
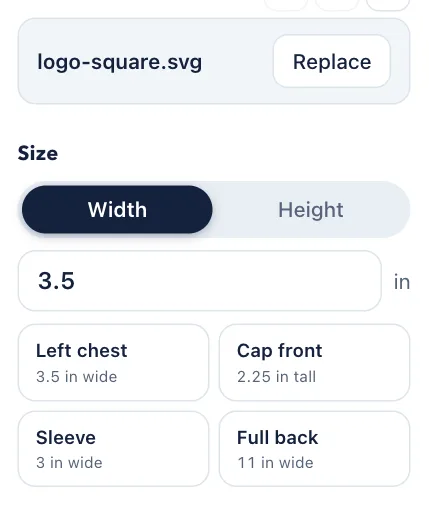
Step 2. Set the size. Under Size, type a width or height in inches, or click a preset: Left chest (3.5 in wide), Cap front (2.25 in tall), Sleeve (3 in), Full back (11 in). The logo here is set to Left chest.
Step 3. Pick the fabric and the garment colour in the bar under the hoop. The fabric changes how it is stitched, so pick it before judging the design. The logo here is on twill, on a white garment.

The window now shows the logo as it will sew:
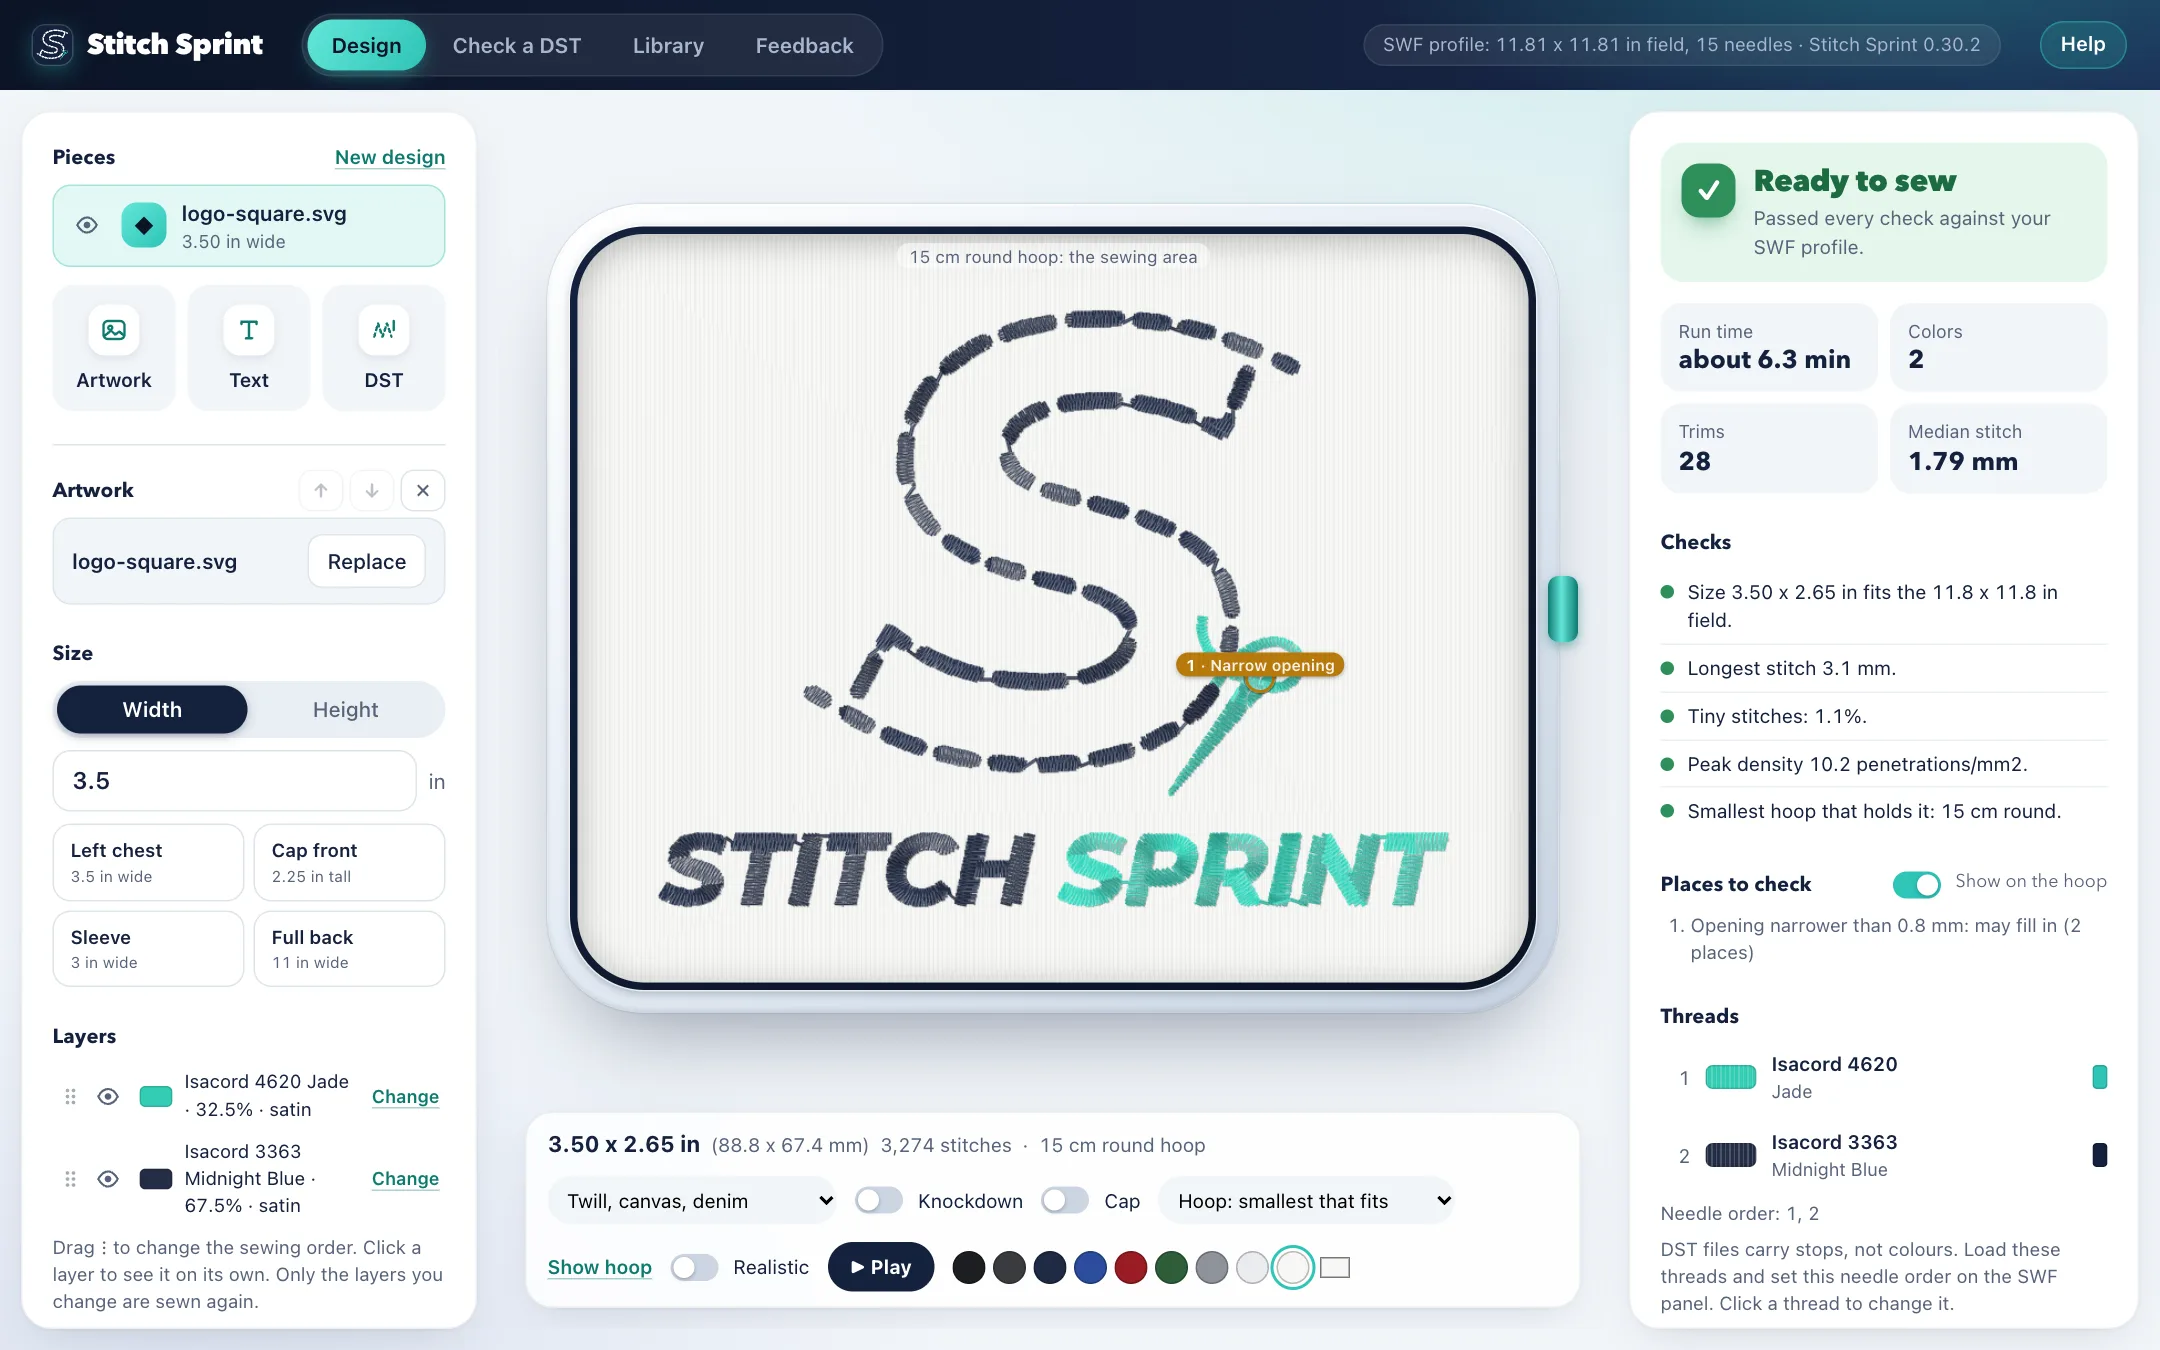
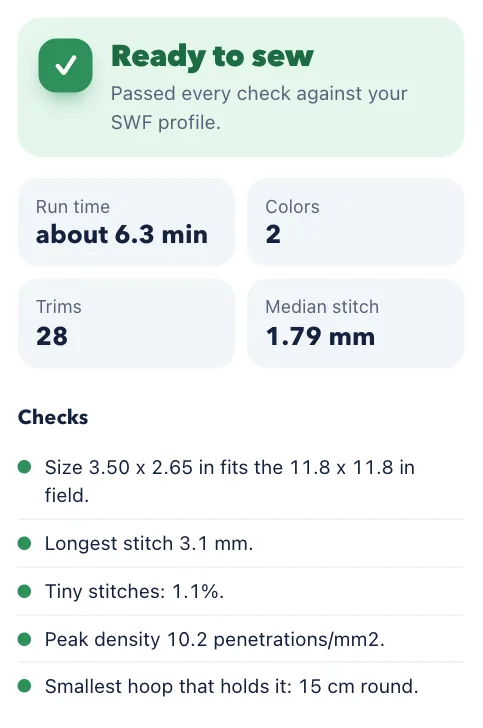
Step 4. Read the verdict at the top right:
- green, Ready to sew: within every limit;
- amber, Sew a test first: read the warning, then decide. What does this mean? explains it;
- red, Not safe to sew: Save DST stays off until it is fixed.
Under it are the run time, colours, trims and median stitch, then each check. The logo passes every check: 2 colours, about 6 minutes.
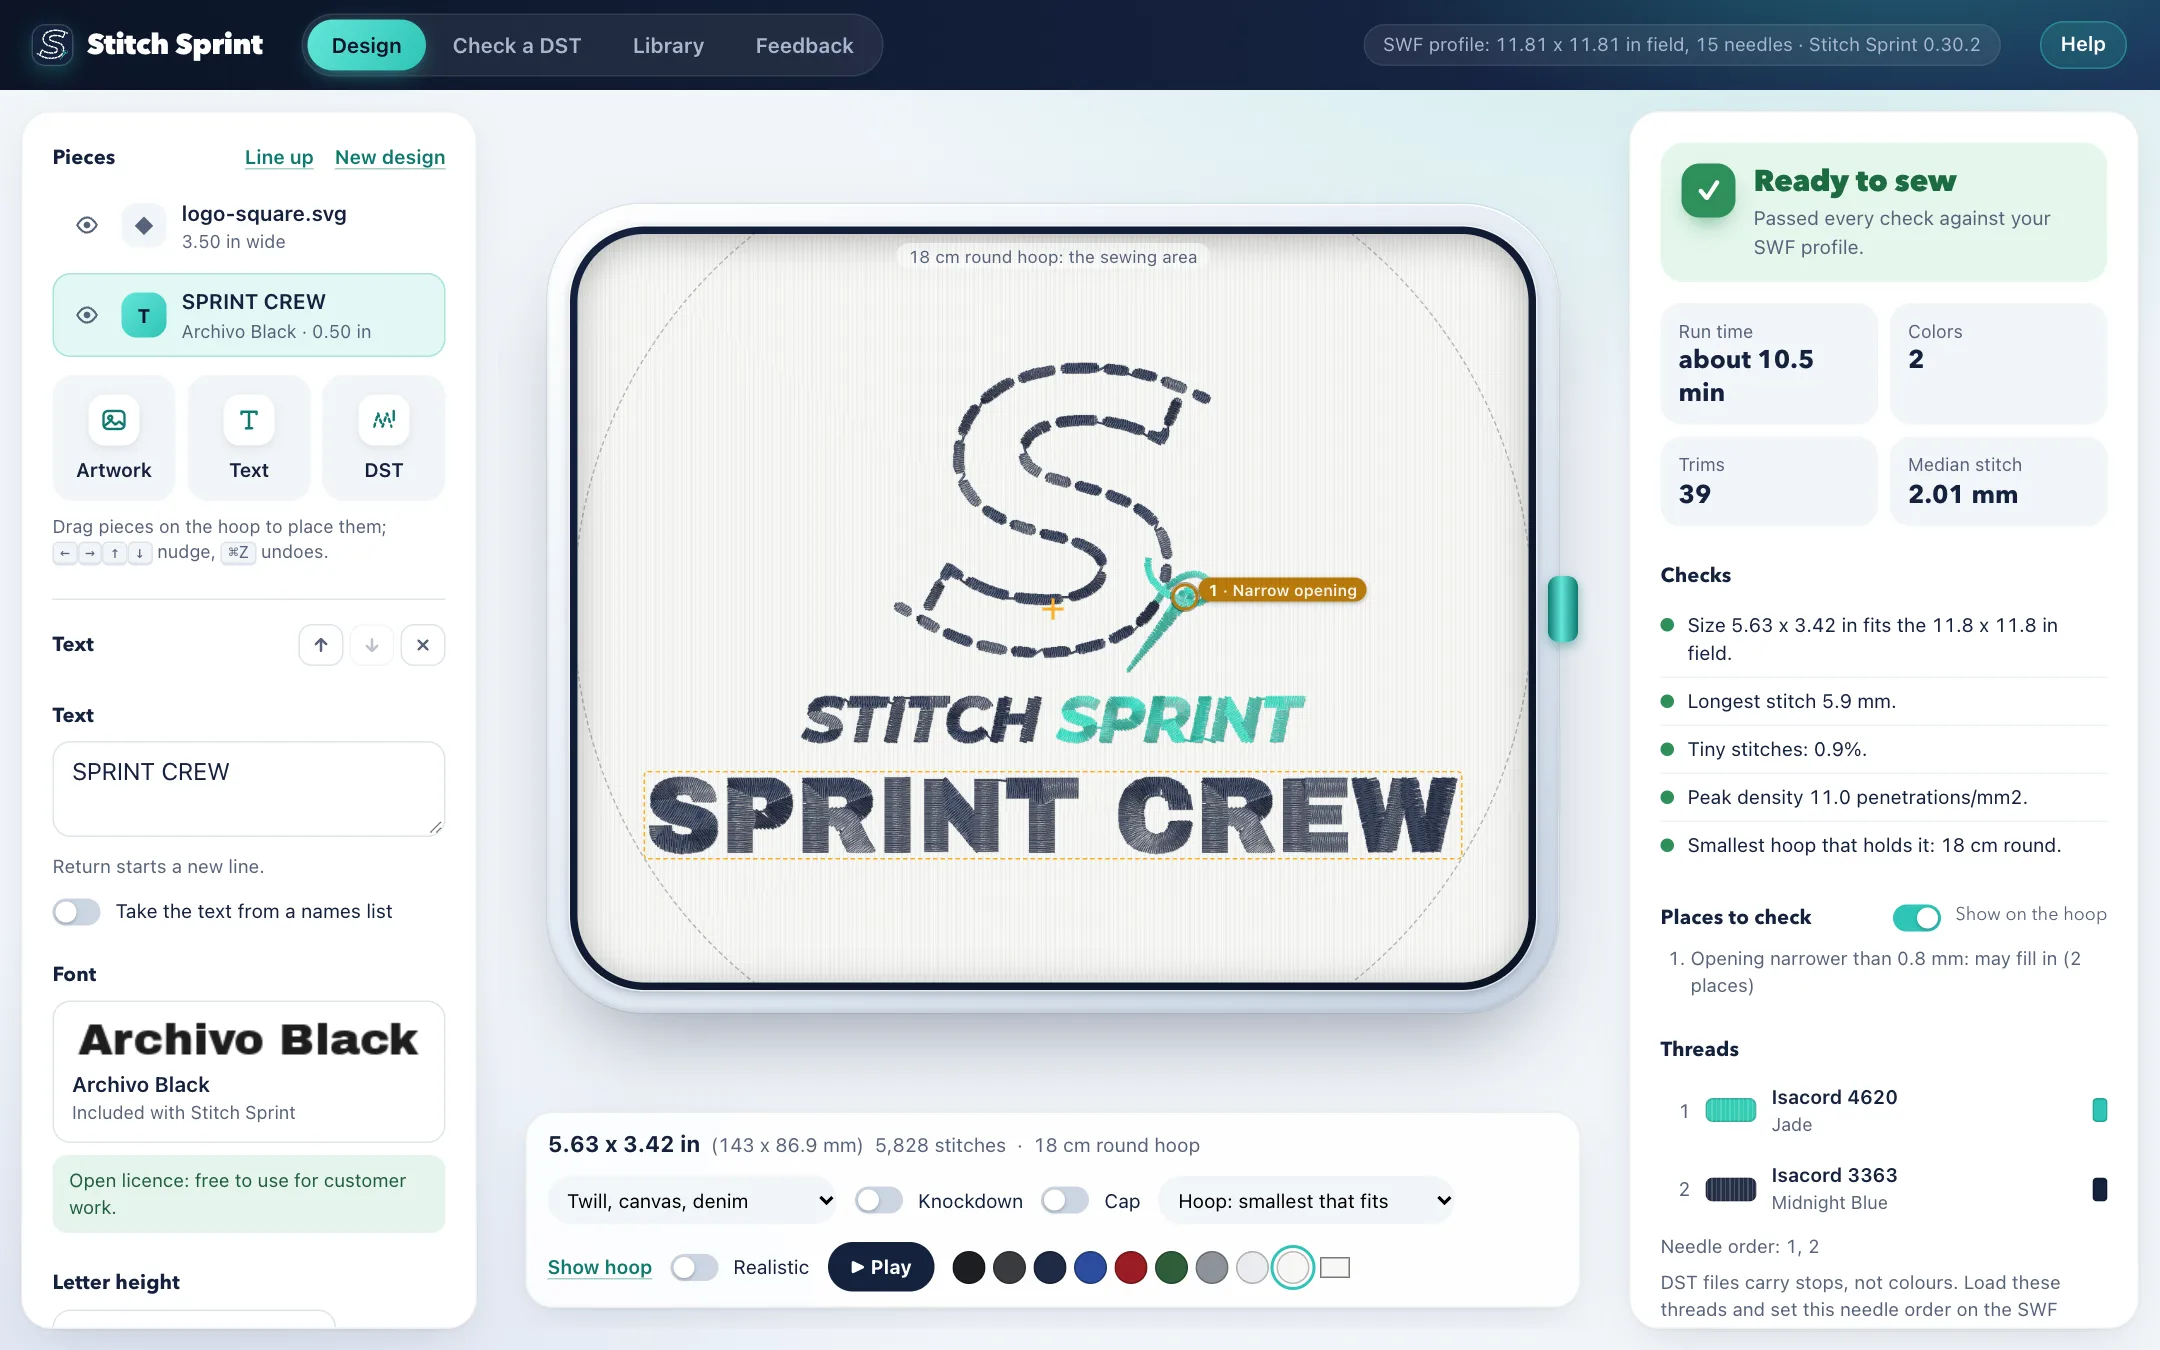
Step 5. Look at Places to check. Each one has a ring on the hoop with a label saying what it is: for the logo, "1 · Narrow opening" near the needle's eye, a gap narrower than 0.8 mm that may fill in. Point at a label for the whole note, or click it to find it in the list. A ring as big as the design means the shape it marks is that big: "Too thin to sew: left out" round a whole logo is usually a hairline outline in the artwork.
Step 6. Save DST (⌘S). See section 13.
White in your art: under the artwork settings, leave White on stitch to sew white as white thread, or pick knockout to leave white areas as bare fabric (when white in the art is really the background).
A PNG or JPG logo? The app traces it first. Under Picture, set Colours if it found too many or too few, and Background colour inside the logo if letter openings sew when they should be fabric (or the other way round). See Picture logos.
Fill looks too heavy or too light? Change Row spacing (bigger is lighter). The fill angle is automatic per shape; set one to override it.
4. Adding a name or slogan
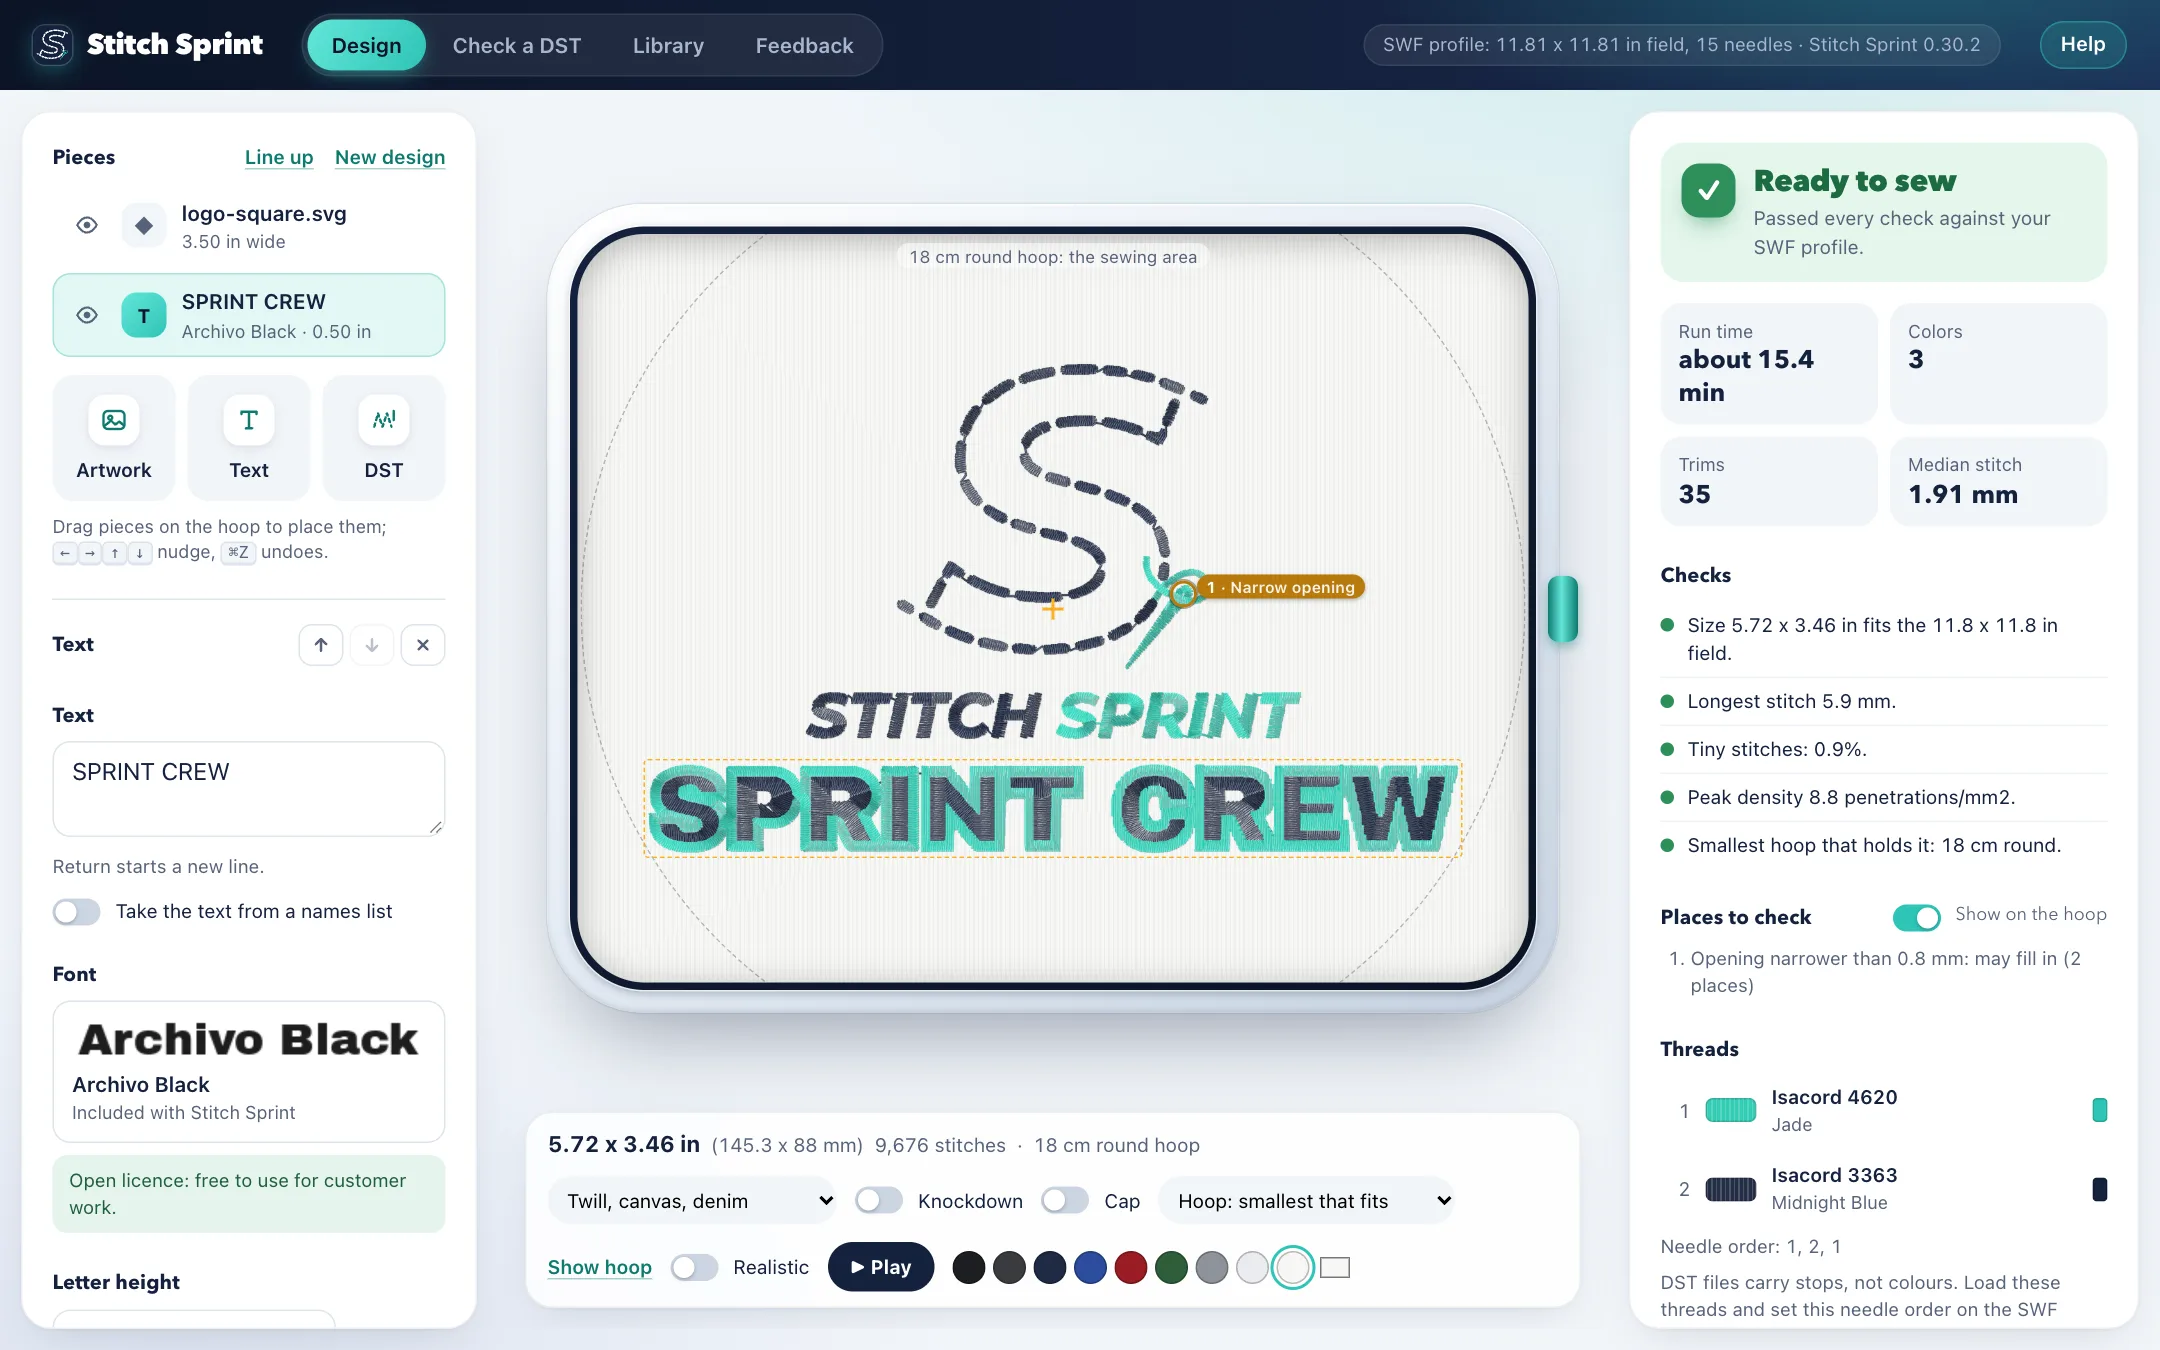
Here the name SPRINT CREW goes under the logo.
Step 1. Click Text on the left. The new piece goes under the logo.
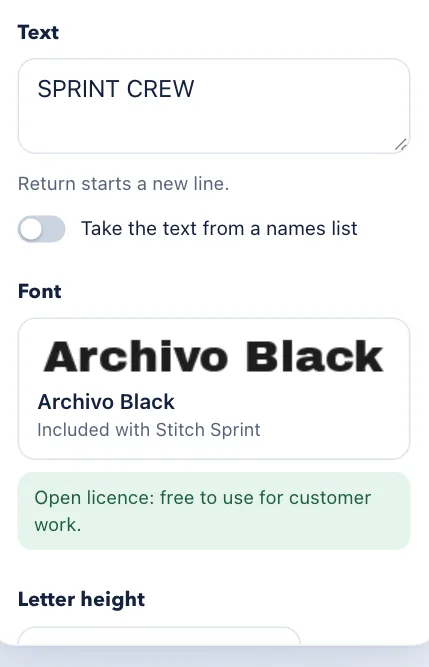
Step 2. Type the text. Return starts a new line.
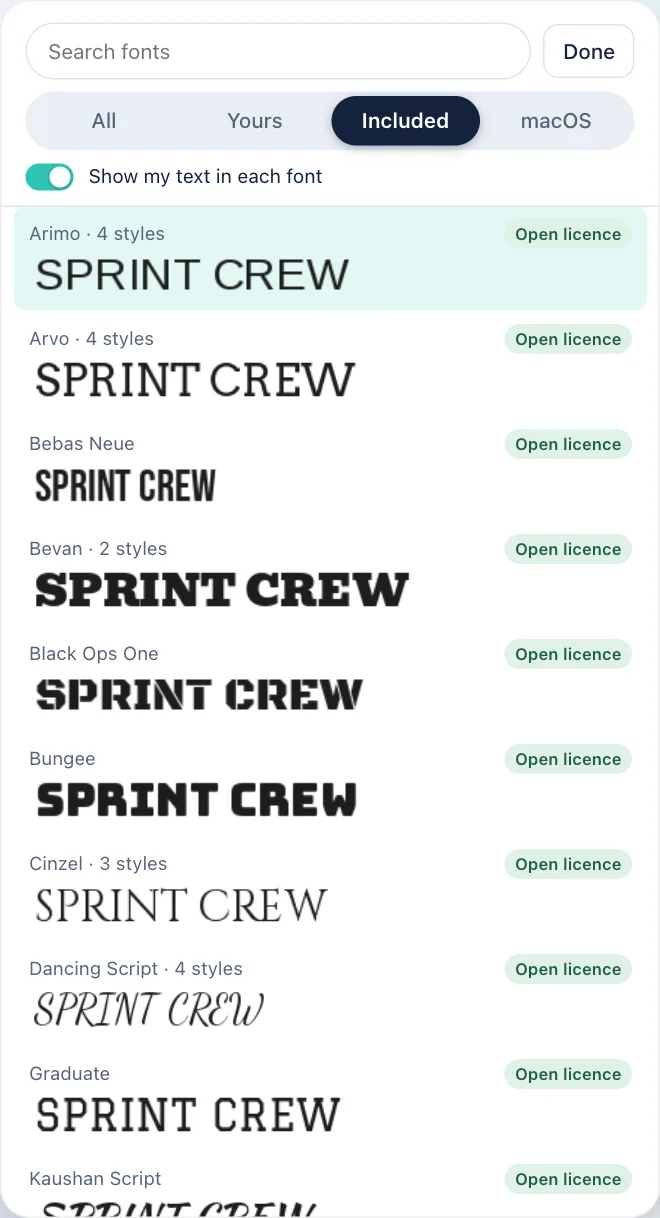
Step 3. Pick a font. Click the font to open the font picker. The Included tab has 31 fonts that are free to use for customer work on any computer. Switch on Show my text in each font to see your words in every font. A warning next to a font means its licence doesn't allow selling items made with it. Here it is Archivo Black.
Step 4. Set the height of the capital letters in inches (here 0.5 in), and the thread colour (here the logo's navy, so it shares the logo's needle).
Step 5. Place it. Drag the text on the hoop. It snaps into line with the logo's centre; hold Option to place it freely, or click Line up.
Also under the text:
- Alignment, line spacing and letter spacing. Keep letter spacing at 0 for script fonts.
- Stitch: leave Auto. It picks satin, fill for very heavy letters, or a run for very small ones.
- Trim between letters: for a little stitch showing between tight letters, switch it on to cut there instead (one more trim per letter).
A name in the same colour as the logo shares that needle and colour stop. The design has also grown to 5.7 in wide, a full-front size: for a left chest, make the name smaller.
5. Team lettering: arcs, badges and outlines
An outline round the letters (athletic lettering)
- Select the text piece. Under Outline, switch on Satin outline round the letters.
- Pick its colour (here the logo's aqua) and its Width: 1.5 to 2 mm suits athletic lettering.
- For a gap of garment between the letters and the outline, set Gap to the letters (0.8 mm or more).
- For two-colour outlines (red letters, white outline, navy outline), switch on A second outline outside it.
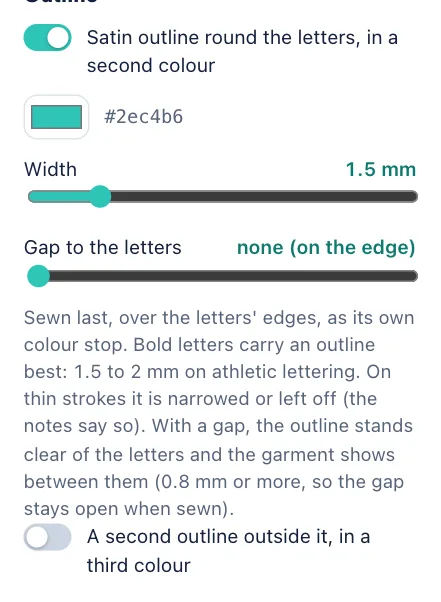
The outline sews last, as its own stop. If the letters are too thin to carry one, the app says so and leaves it off: bold fonts from about 0.5 in carry one well.
Arched text
- Select the text piece. Under Shape, pick Arch up (over a circle) or Arch down (along its bottom, letters upright).
- Set the Radius (the circle the letters sit on).
A badge (top and bottom line on one circle)
- Arch the top line up.
- Click Add the other half of a badge. A second line appears on the same circle, arched the other way.
- Type over its placeholder text.
- Put the logo in the middle.
- If you drag a line off, Put it back on the other line's circle.
6. A team order from a names list
- Build the design with the logo (and number, slogan) and one text piece for the name, styled the way the names should look.
- On the name piece, switch on Take the text from a names list.
- Paste the names, one per line, or Open CSV…. For name and number columns, separate with commas or tabs; switch on First line is column names if there's a heading. A number piece can take its own column.
- Set Fit within (starts at the logo's width) and No smaller than. Long names get smaller letters down to that height; any still too wide is flagged.
- Step through the names with the arrows over the hoop. Each is checked.
- Save all N names. The hoop says which name it is on. You get a folder
NAME - namesin the saved designs folder, with one DST per name, a roster (Roster.csv,Roster.txt) and the design file. Names that fail go torejected/in that folder.
7. Adding to a customer's DST
- Click DST (or Open a DST) and choose the file. PES, EXP, JEF, VP3 and other formats work too.
- Each stop shows in a stand-in colour (DSTs don't carry colours). Click each under Threads and pick the real thread.
- Add a Text piece for the name and place it.
- Don't scale the DST outside 90-110% unless you test sew it.
- Want to drop part of it (a background fill)? Switch that stop off under its Layers.
- Save DST. A customer's PES becomes a DST for your machine this way.
8. Choosing threads
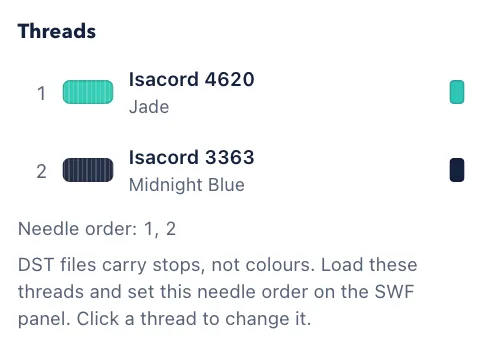
- Each colour gets the nearest Isacord thread, with its number and the needle it goes on. The logo's aqua is Isacord 4620 Jade on needle 1, its navy Isacord 3363 Midnight Blue on needle 2.
- Click a thread to pick a different one (or click a colour's swatch under Layers). The hoop redraws in the new thread.
- Colours that become the same thread share a needle.
- The needle order under Threads is what you set on the machine.
- Screen colours are approximate: check a thread card for close calls.
9. Fabric, caps and hoops
- Fabric sets pull compensation, underlay and density, and the worksheet lists the stabilizer, needle and any topping. Pick it before you judge the design.
- Knockdown is on for towels. Switch it on for small lettering on fleece.
- Cap sews bottom up and from the centre out. The Cap front preset switches it on.
- Hoop: the smallest that holds the design is chosen. Pick another (including the Magnetic hoops) from the menu. Show hoop zooms out to the whole sewing area.
- Default hoop: pick the hoop you use most and click Make default beside the menu. Stitch Sprint then starts on it each time it opens, and each new design does too. A saved design opens in its own hoop. See your default hoop.
10. Watching it sew
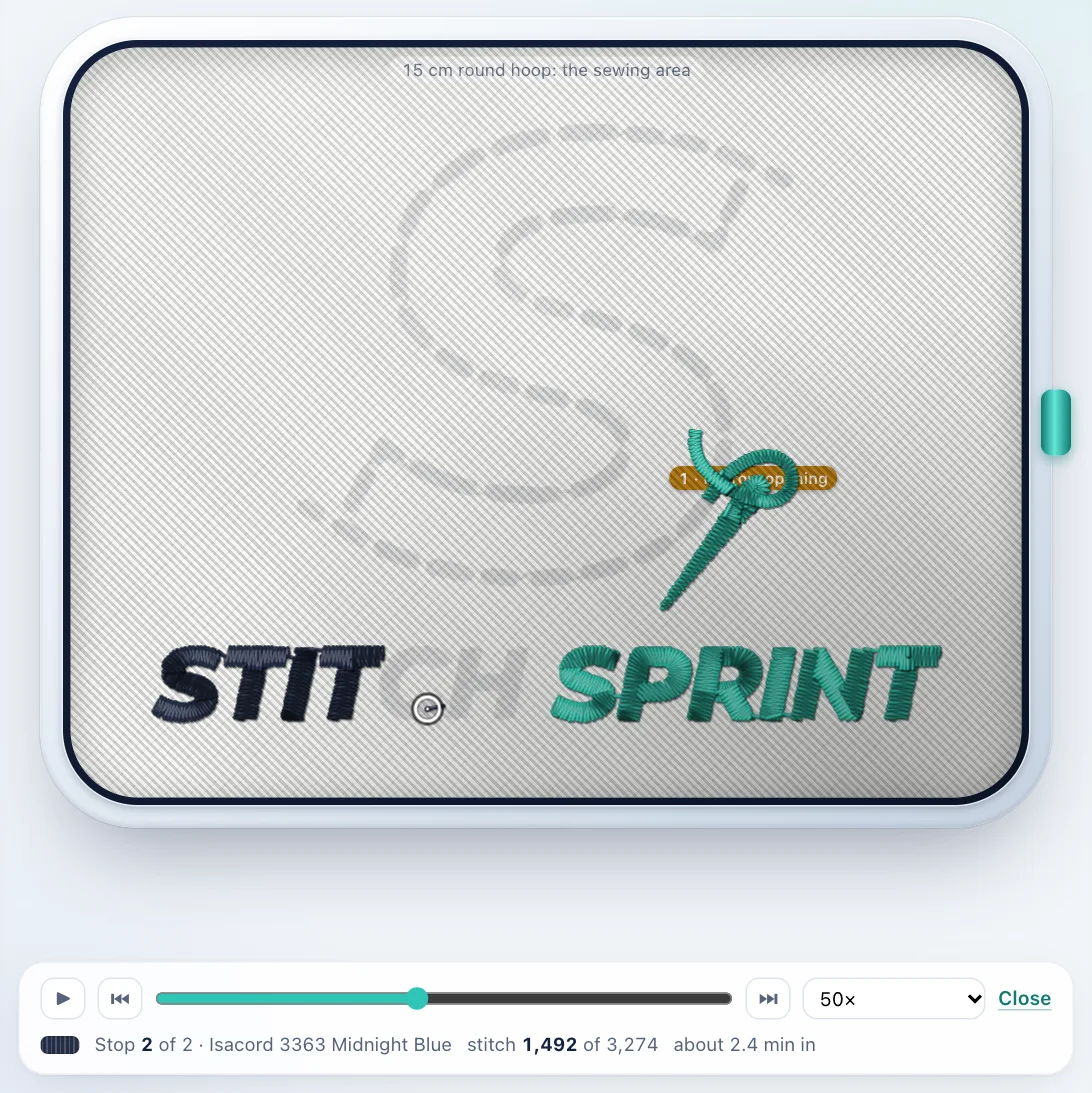
Realistic (under the hoop) draws the stitches as thread with depth, on the chosen fabric's weave. It changes only the picture, not the file.
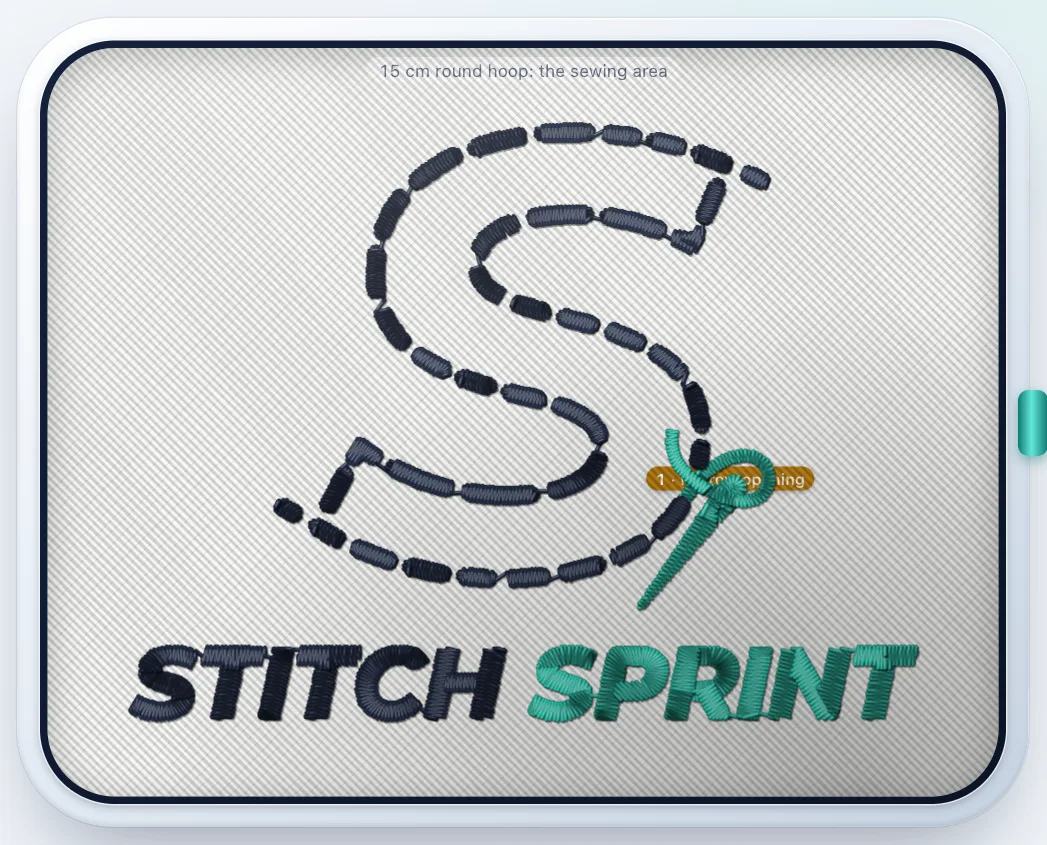
▶ Play sews the design on screen. Space pauses, the slider jumps to any stitch, the arrows jump between stops, and the speed goes up to 200×. The line under it says the stop, its thread, the stitch and the minutes into the run.
11. Layers: switching colours off and changing the order
Select an artwork piece and look at Layers. Each colour is a layer, in the order it sews, with the thread it sews in, its share of the design and how it sews.
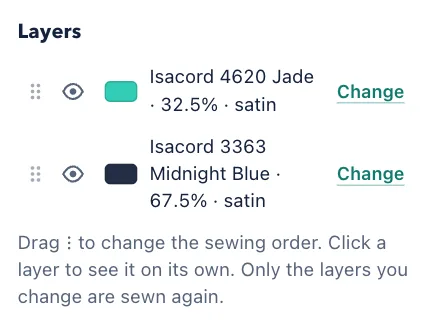
- Colour swatch: click it to sew that colour in a different thread.
- Eye: switch a colour off.
- Change: that colour's own fill angle, row spacing, or All fill.
- Drag by ⋮: sew a colour earlier or later. Test sew for gaps where colours meet.
- Click a layer's name to see it alone; then click single shapes on the hoop to switch them off.
- Shapes joined together (an opening filled with white that is part of all the white, say): with the layer shown alone, drag a loop round the part you don't want. Just that area is cut out of that colour. Put back the last cut or ⌘Z undoes it.
- Show all or Esc to see everything again.
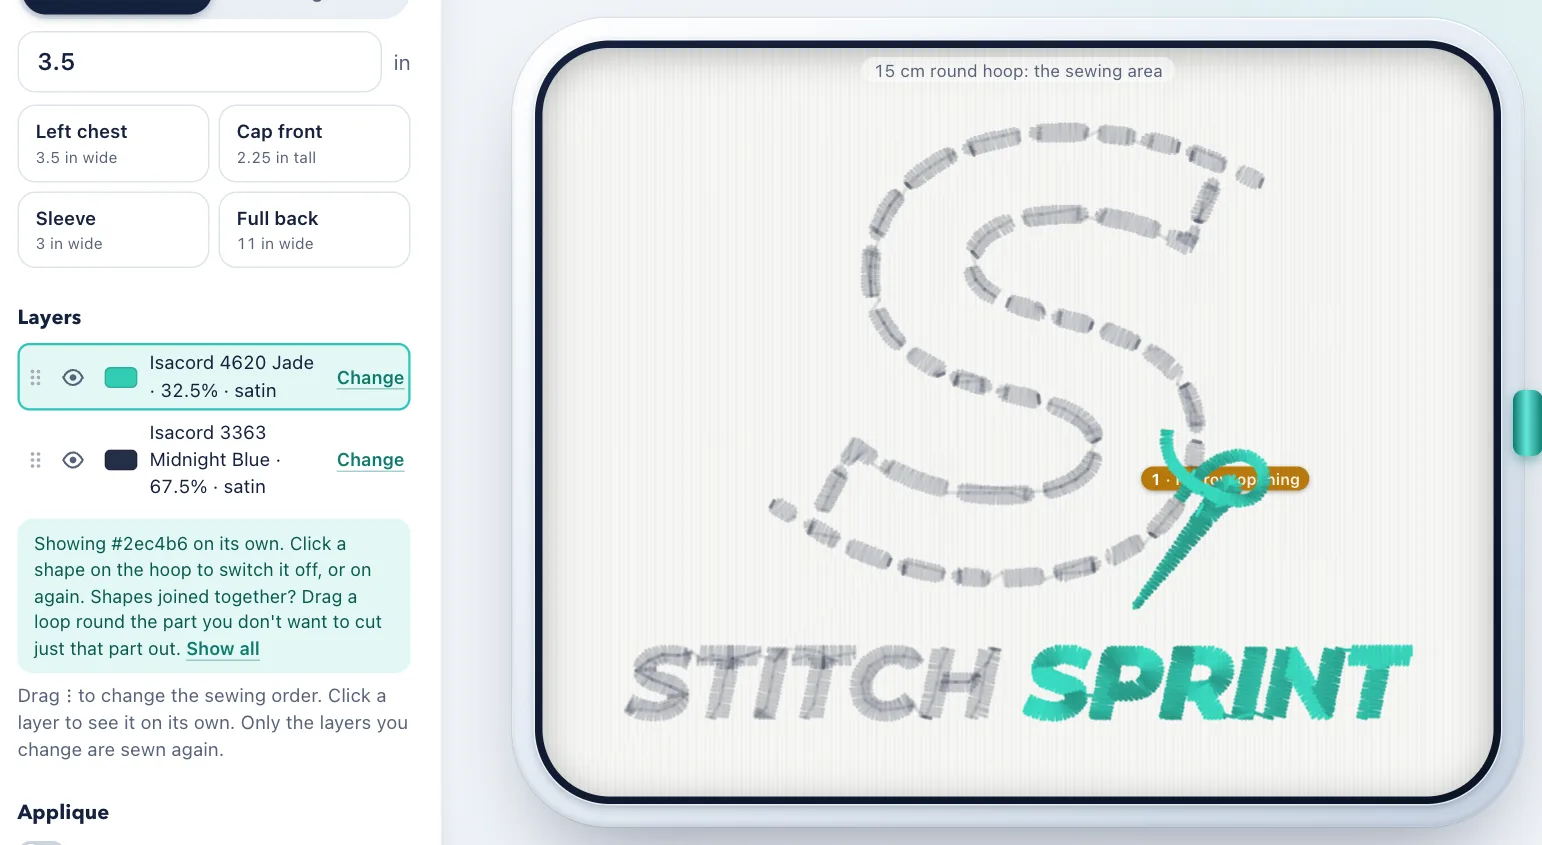
The eye on a whole piece in the list switches the piece off.
12. Applique and tackle twill
- Select a text or artwork piece and switch on Sew as applique.
- Pick the border: satin or zigzag (usual for twill), 1.5 to 6 mm.
- Switch on Cut in place if the fabric is trimmed on the machine.
- Save. You also get
NAME cut.svgto cut the fabric on a Cricut, Silhouette or laser. - On the machine: stop 1 sews the placement line; lay the fabric; the tack-down sews; (trim if Cut in place); the border sews.
13. Saving, and what you get
- Type a name for the design (here "Stitch Sprint logo").
- Click Save DST (⌘S). For a customer with another machine, first tick the formats under Also save as (PES, JEF, EXP, XXX, U01).
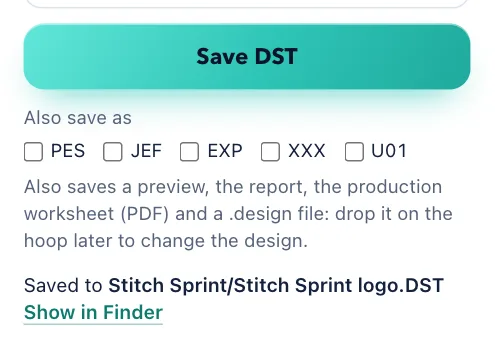
It writes to the saved designs folder, Documents/Stitch Sprint (File > Show Saved Designs opens it):
NAME.DST: the machine file;NAME.png: the preview;NAME.txt: the report, with threads and needle order;NAME.pdf: the production worksheet;NAME.design: to open and change later.
The worksheet is the sheet for the machine operator: the picture with the start point, stitches, stops, trims, run time, the extents, each stop's thread and needle, the stabilizer and needle for the fabric, and the checks.
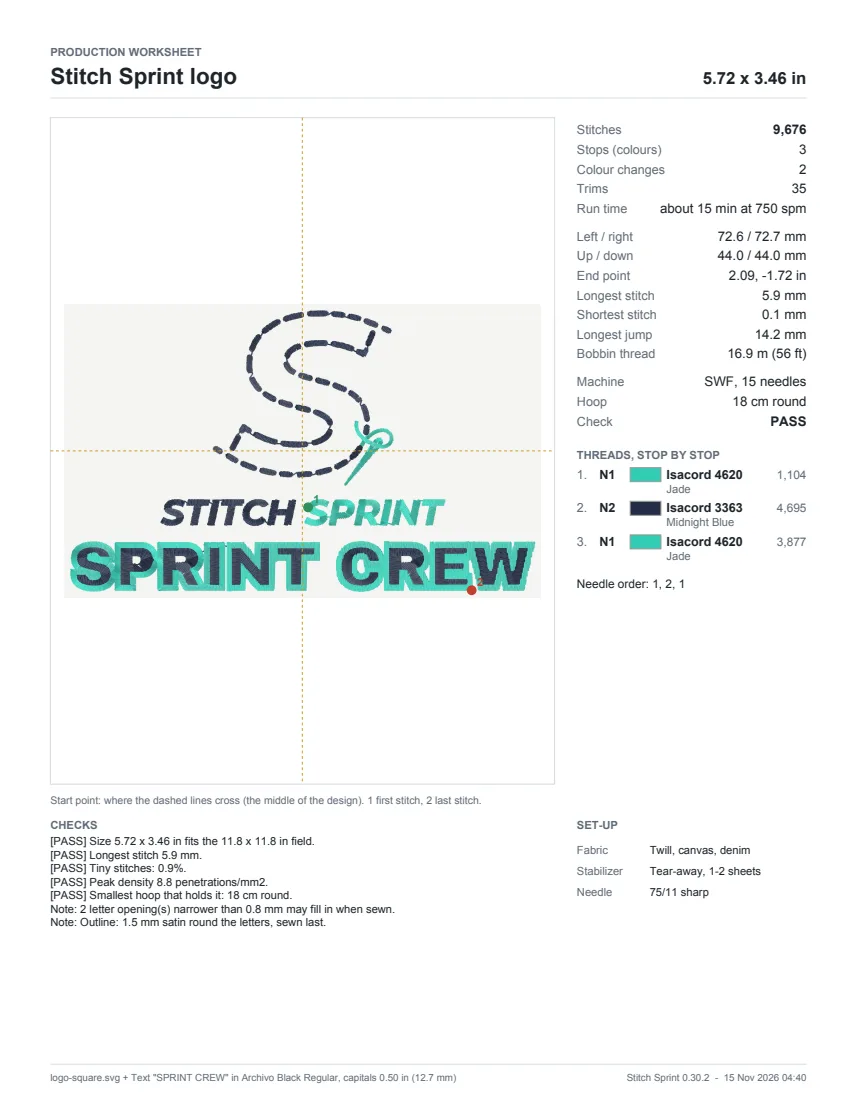
Files are never overwritten: saving again makes NAME_v2. A file that fails the check goes to rejected in the saved designs folder.
14. A proof and a price for the customer
Once: Shop name and prices… (under the proof): shop name, price per 1,000 stitches, minimum each, each extra colour, set-up per order, quantity discounts (12: 10%, 24: 15%) and the currency sign. Leave the price per 1,000 stitches empty for proofs without a price.
Each proof:
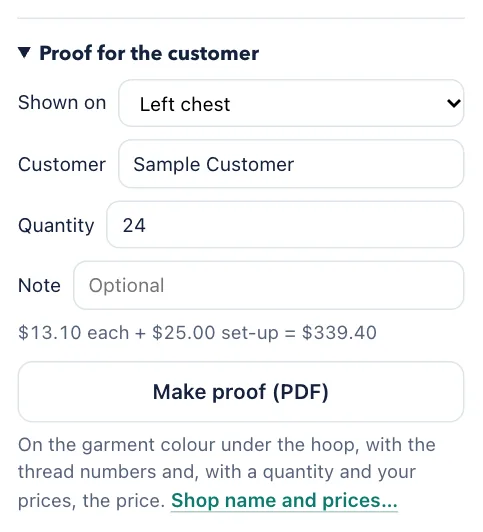
- Under the save button, open Proof for the customer.
- Pick where it goes: left chest, full front, full back, cap front, or design only.
- Enter the customer name, quantity and a note. The price shows as you type (here 24 at $13.10 each plus $25.00 set-up, $339.40 in all).
- Make proof (PDF). It opens in your PDF viewer (Preview on a Mac), ready to email, and is saved as
NAME proof.pdf.
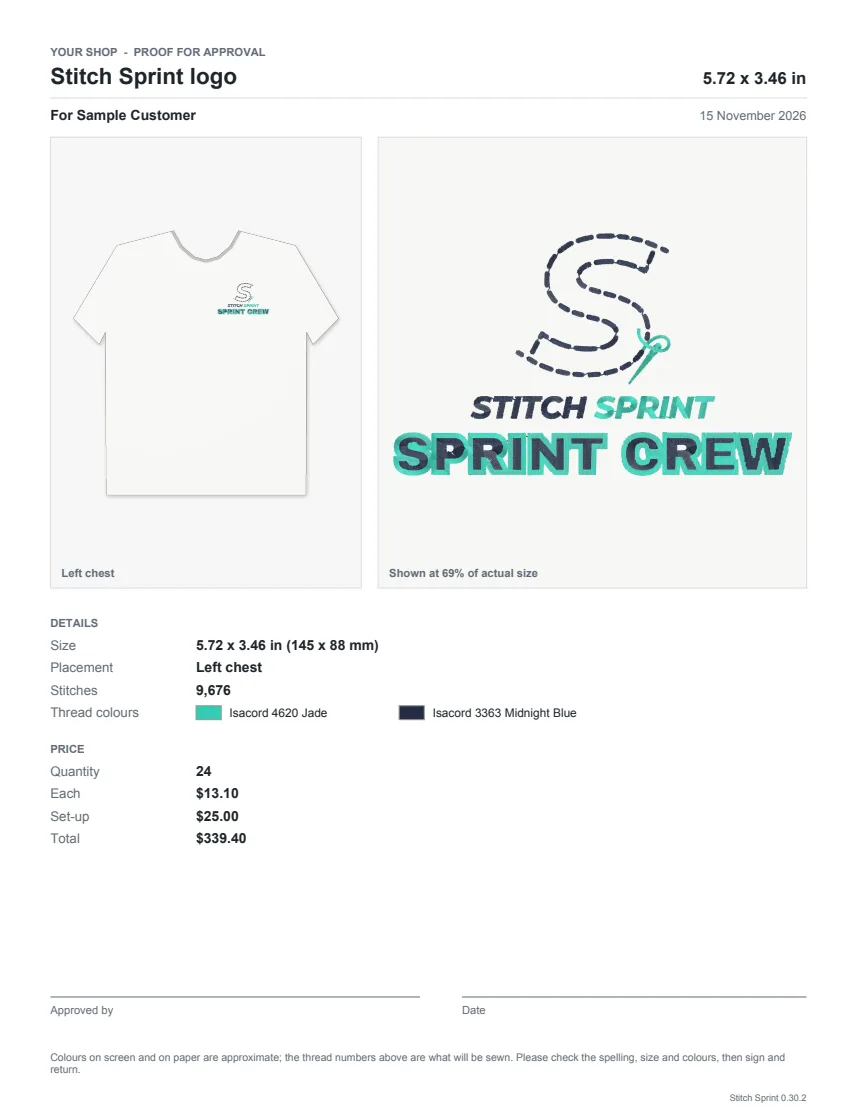
Tell the customer to print at 100% to see the design at actual size.
15. Checking and fixing a DST
- Open the Check a DST tab and click Choose file (or click a design in the Library).
- Read the verdict and the checks.
- If there is a Fix it box, click Fix what the check found. Compare with Show the file as it came.
- Save fixed DST saves
NAME fixed.DST. Your file is never changed. - Add to a design places it (fixed or not) in a design.
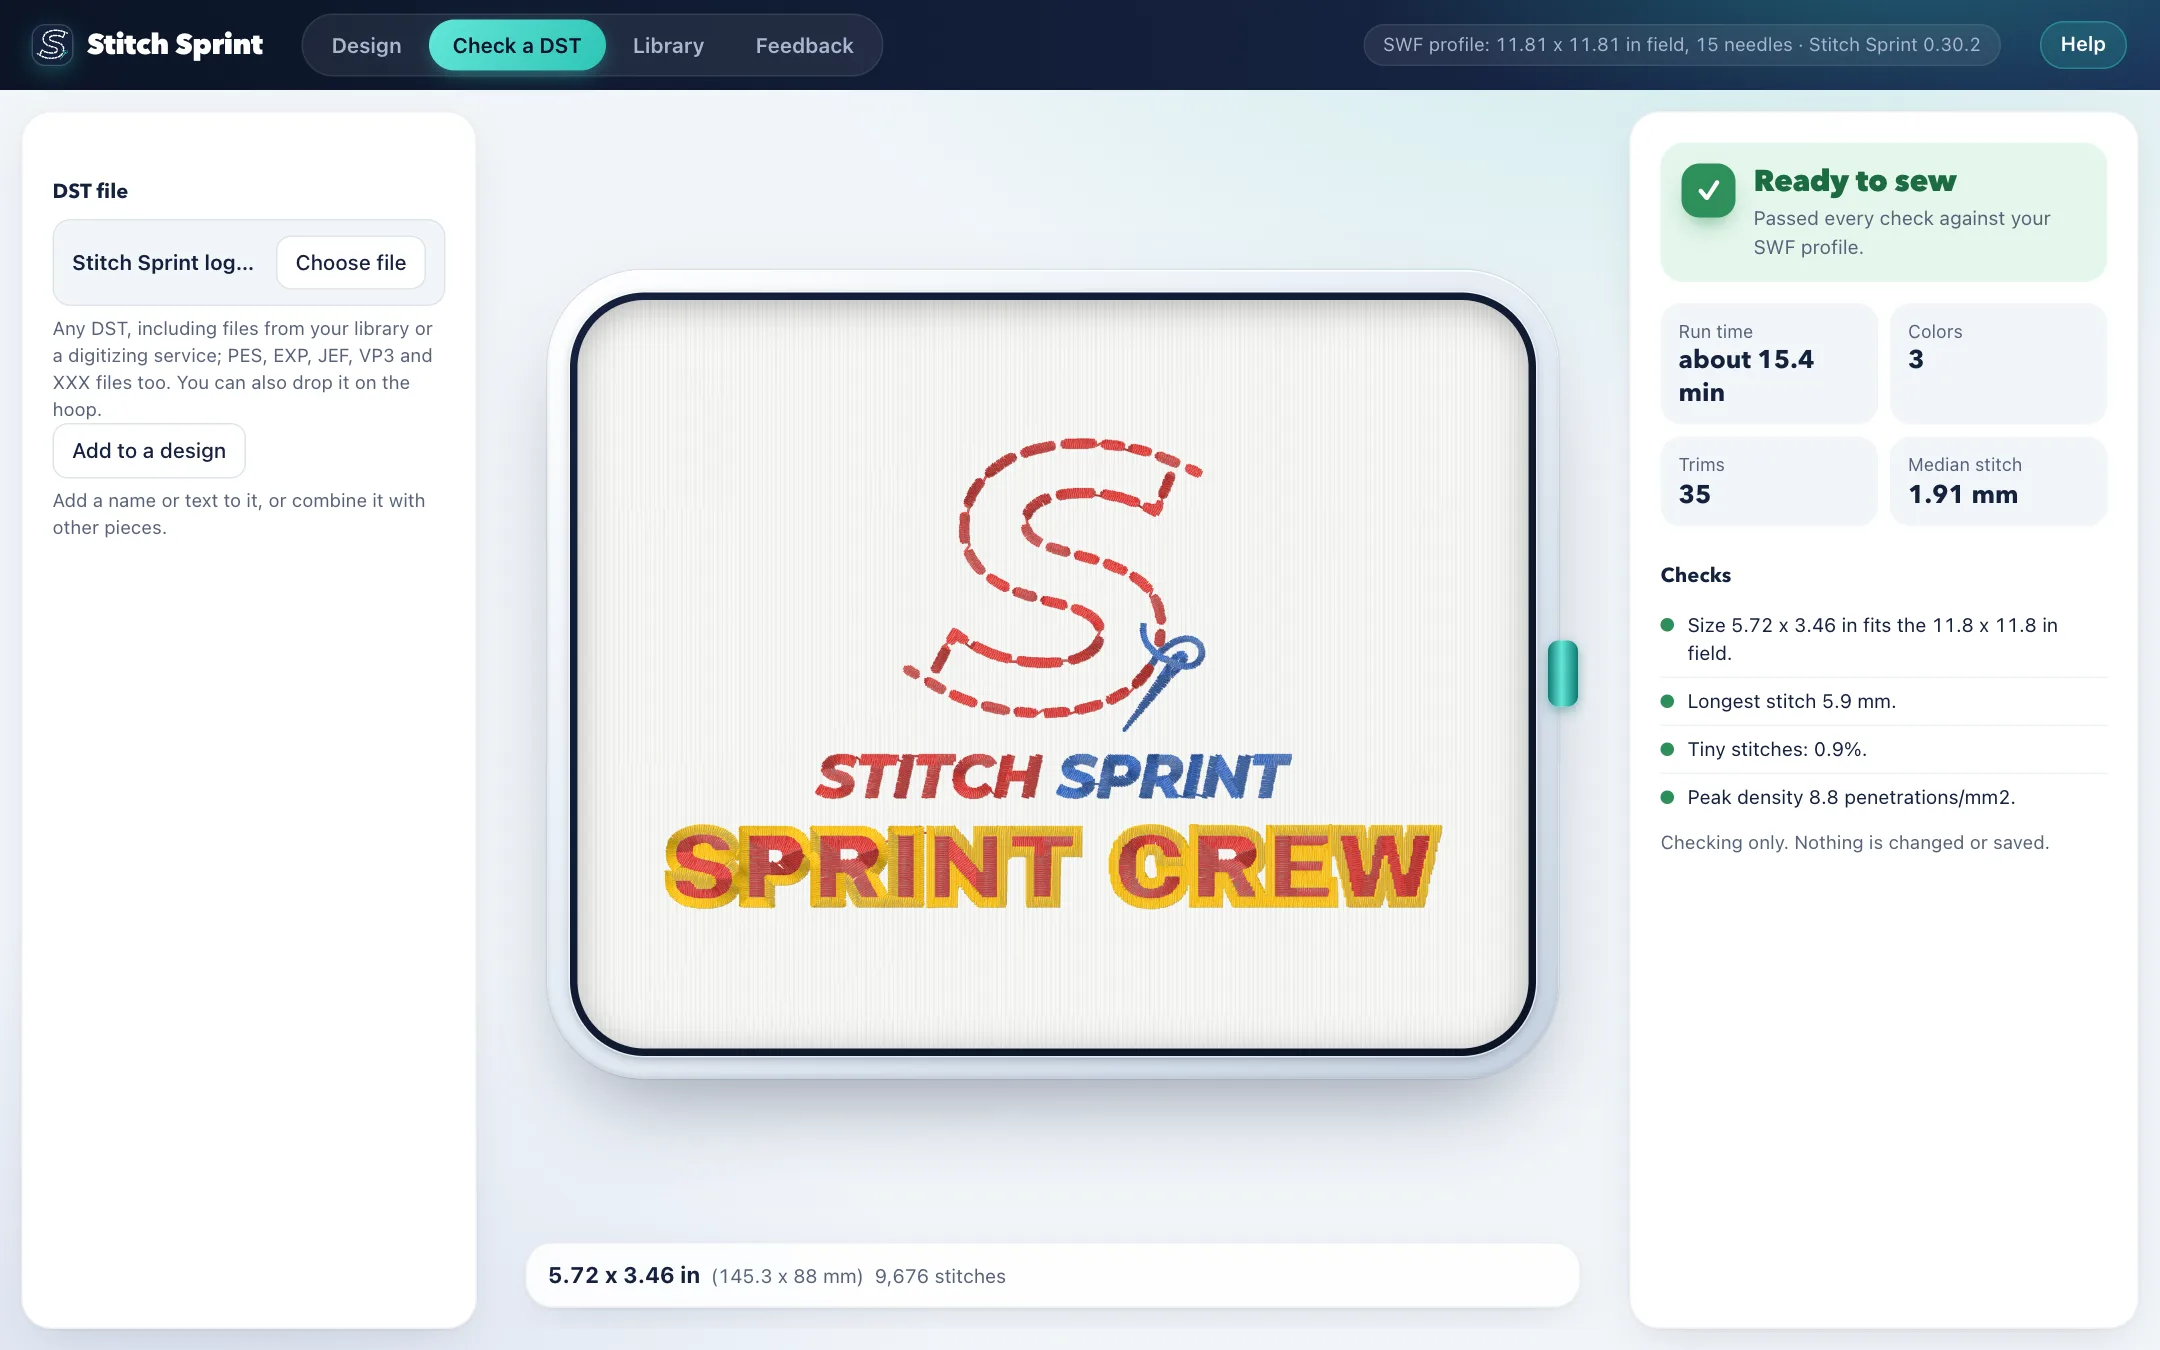
The doctor fixes long stitches, dragged jumps and tiny stitches. It does not fix a design too big for the field, too many colours, or a dense spot.
16. The library
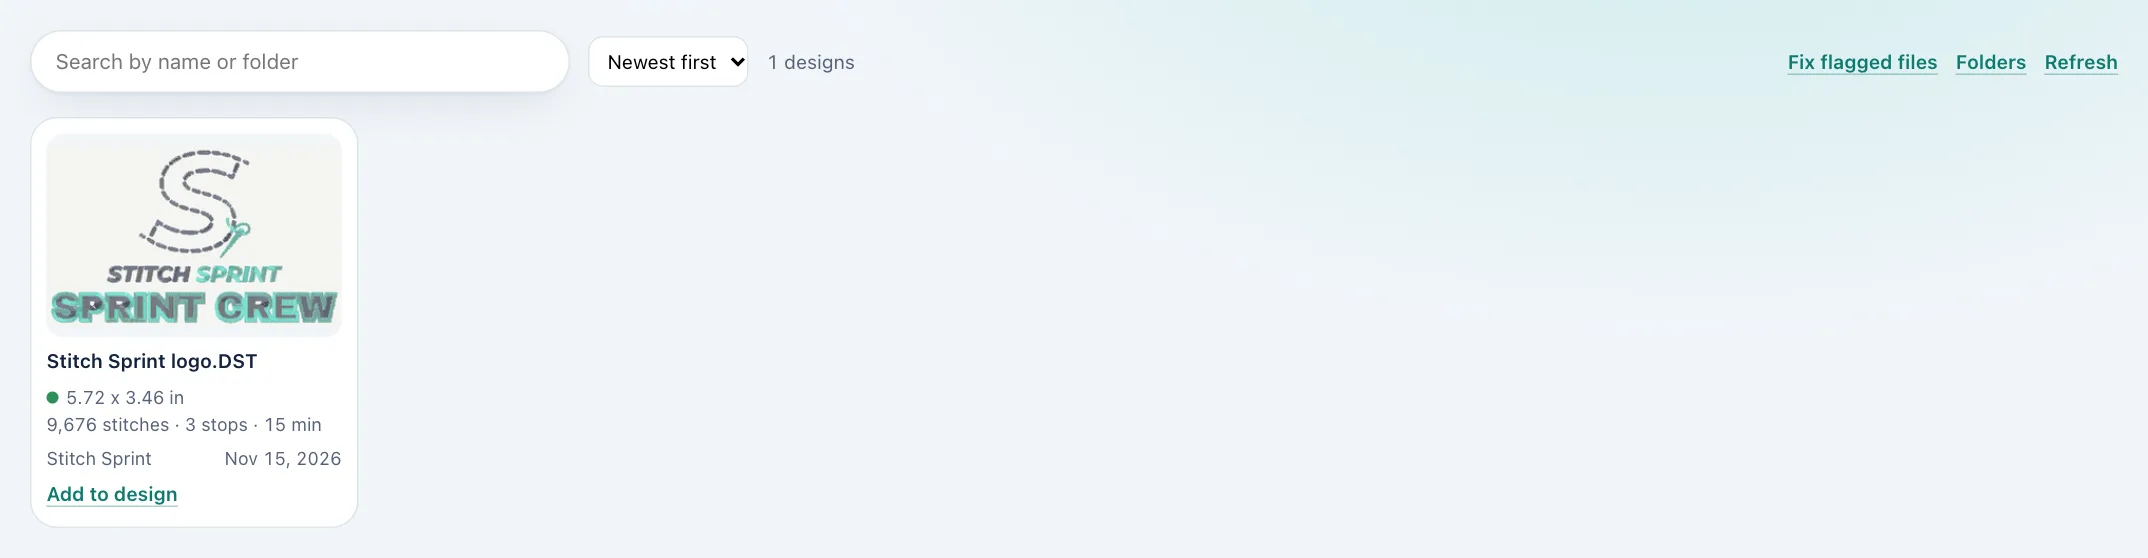
- Open the Library tab. It shows every stitch file in its folders, with a picture in its thread colours, its size, stitches, stops and run time, and a green, amber or red check. A DST from elsewhere, with no report beside it, shows in stand-in colours (grey for one colour). A design saved in several formats is one card, with the other formats after its name (+ PES, JEF).
- Search by name or folder; sort by date, name or folder.
- Click a design to check it; Add to design to use it.
- Folders adds or removes folders. At first the library is the saved designs folder.
- Fix flagged files saves fixed copies of every flagged file the search shows, in
Fixed by the doctorin the saved designs folder. Search for a folder first to do just that one. - Bonus designs that came with your subscription, such as the Christmas Collection, are downloaded after you sign in. A note at the bottom right says when they're here; Show it opens them in the library.
17. Running it on the machine
- Open the worksheet (
NAME.pdf) or report (NAME.txt). - Hoop the garment with the stabilizer and needle the worksheet lists.
- Set the needles from the needle order in the report. DST files don't carry colours.
- Load the DST. The design starts at its centre.
- New design? Test sew it first on scrap of the same fabric with the same stabilizer, at reduced speed. See the best practice guide.
18. Changing a saved design
- Double-click
NAME.design(or drop it on the hoop). - Change what you need.
- Save. It saves as
NAME_v2.
Text needs its font installed on the computer that opens it; included fonts are always there.
19. Telling us how it sewed
The Feedback tab sends notes and photos to the people building Stitch Sprint. It is how the stitching gets better.
- After sewing a design, open the Feedback tab.
- Choose Sewed well, Small problems or Didn't sew right, and say what happened. The design's name is filled in; add what it was sewn on and your machine.
- Click Add photos (or drop them in) for pictures of the sew-out.
- Click Send sew-out note.
- To ask for something Stitch Sprint doesn't do yet, click Request a feature, describe it, and click Send feature request.
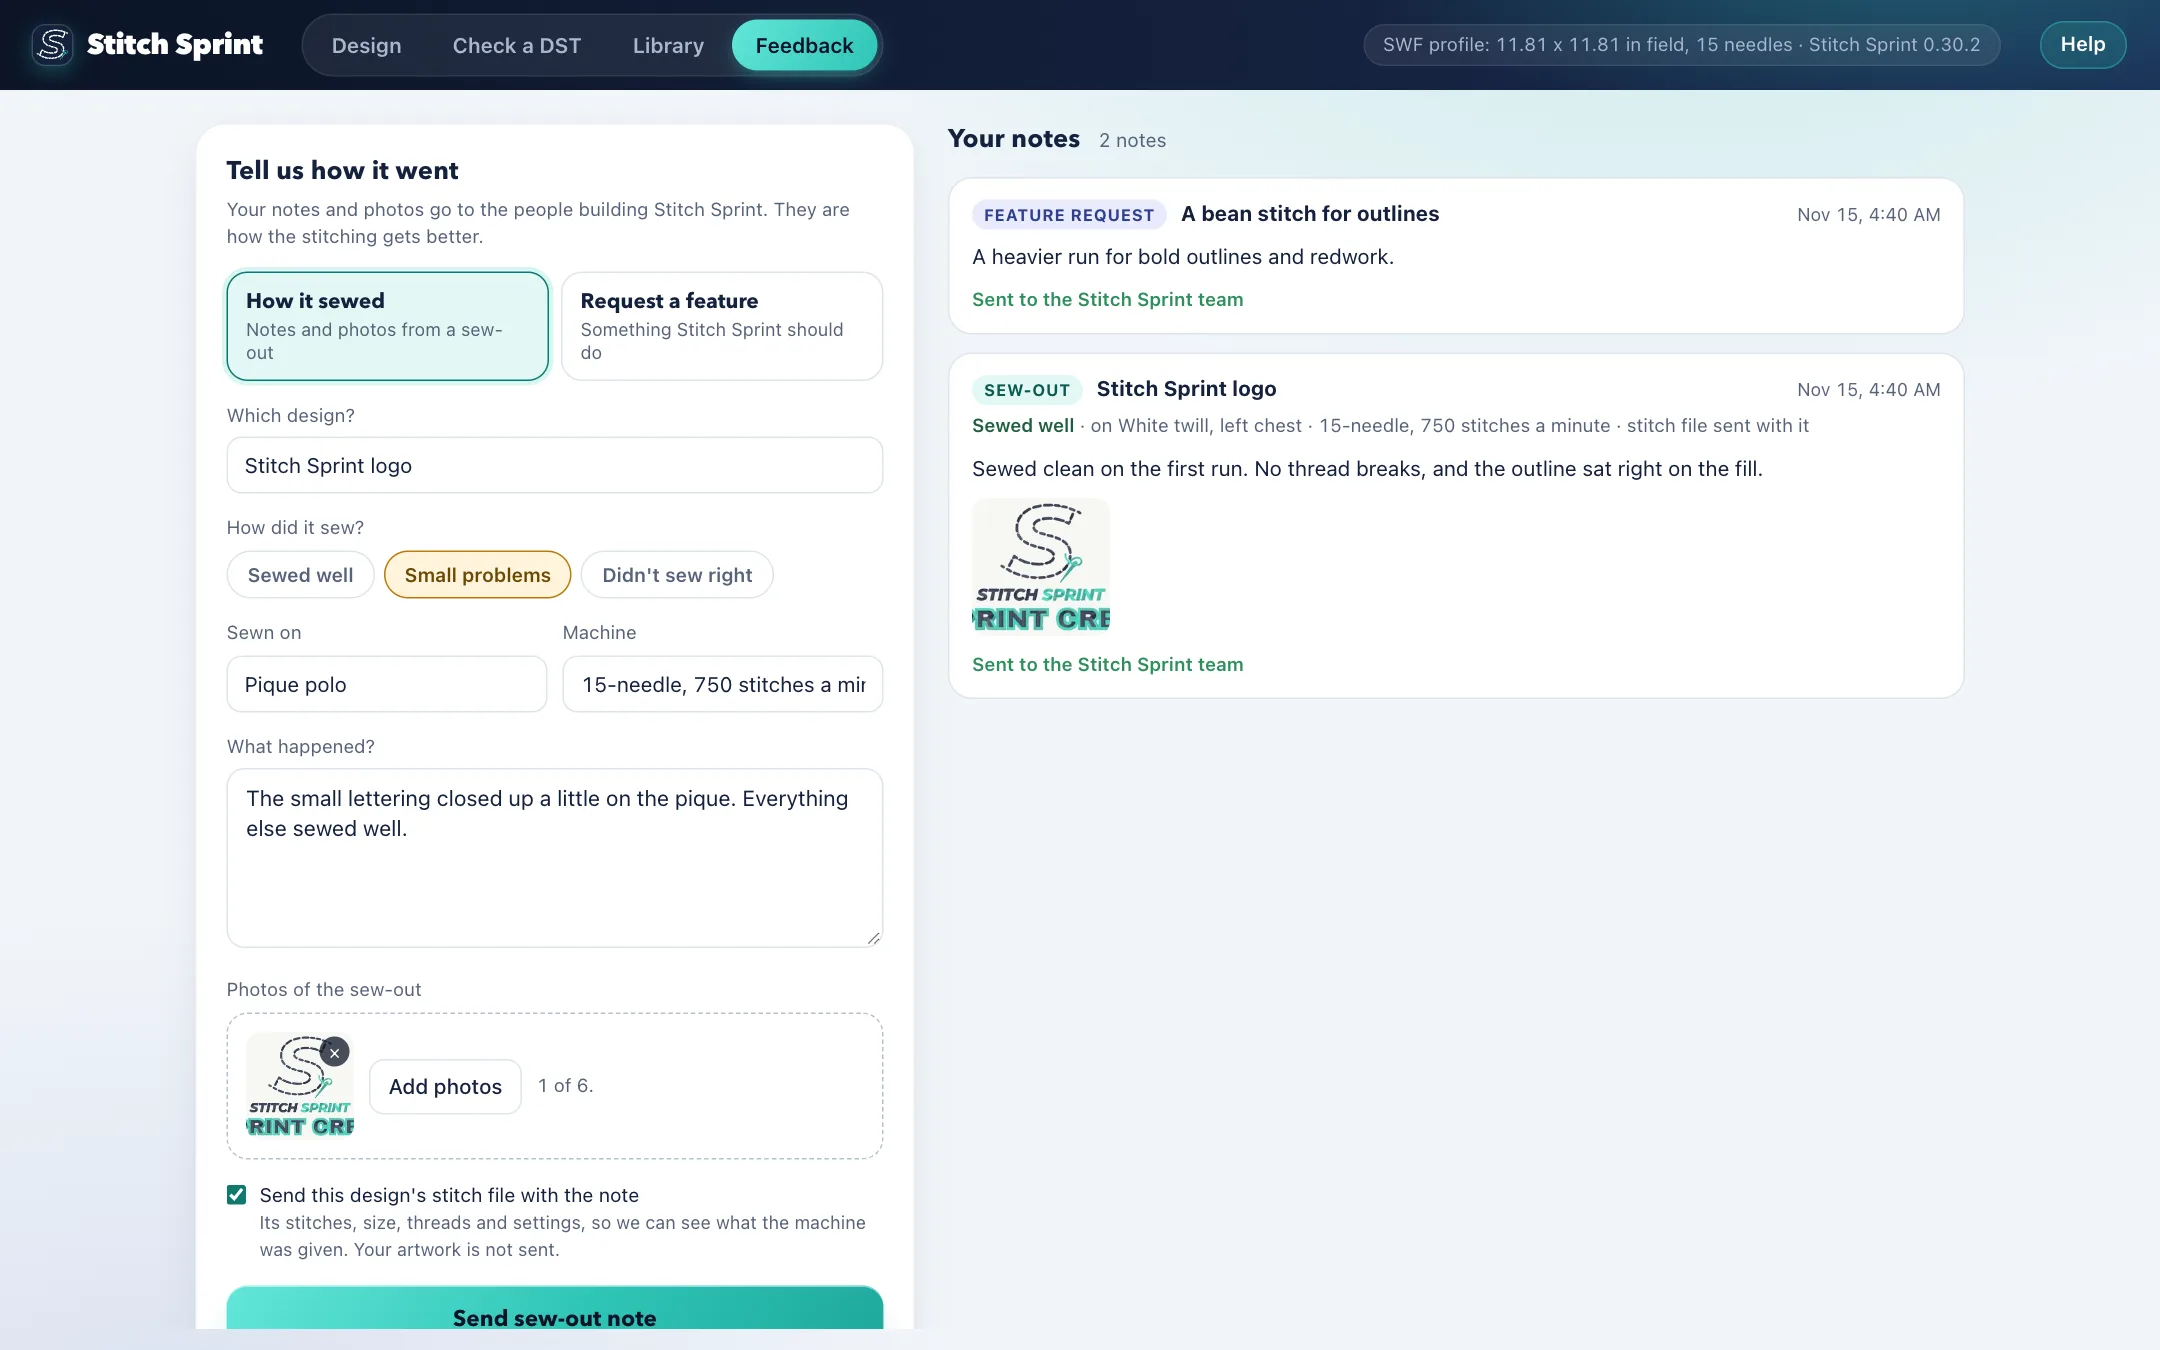
Your notes are listed on the right with their photos. Without internet a note waits on your computer and goes the next time Stitch Sprint is opened online. More in Feedback.
20. Getting help
- Help at the top right of the window, or Help in the menu bar, opens this Help center in your browser. It comes with the app, so it works without internet. The search box at the top finds any word.
- Something not working? Troubleshooting lists the usual problems and what to do.
- When the check is amber or red, What does this mean? under the verdict opens the page about the check.
- Still stuck? See Getting more help.